
Tech Tip: Displaying your own Tool Bar
PRODUCT: 4D | VERSION: | PLATFORM: Mac & Win
Published On: September 27, 2002
Campatibility: 6.7 and 6.8
This tech tip will show you an easy approach for implementing your own Tool Bar.
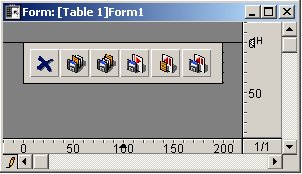
- Create a detail form to act as a Tool Bar.
- Create the following method:
` Project Method: Set_Custom_Tool
` Hide the default Tool Bar and display
` the custom Tool Bar instead.
` $1 - Form name
` $2 - Pointer to the form table
` $3 - Height of the custom tool bar
HIDE TOOL BAR
C_TEXT($1;$form)
$form:=$1
C_POINTER($2;$tblPointer)
$tblPointer:=$2
C_LONGINT($3;$formHeight)
$formHeight:=$3
C_LONGINT($Height;$gleft;$gtop;$gright;$gbottom)
$Height:=Menu bar height+1
SCREEN COORDINATES($gleft;$gtop;$gright;$gbottom)
Open window($gleft;$Height;$gright;$Height+$formHeight;-Plain dialog box )
DIALOG($tblPointer->;$form)
SHOW TOOL BAR
` Project Method: Choose_Tool
` This method is necessary because you
` cannot pass a pointer between processes.
Set_Custom_Tool ("Form1";->[Table 1];200;42)
` Project Method: Show_Custom_Tool_Process
$proc:=New process("Launch";32000;"Custom Tool")
- Now when you execute the method Show_Custom_Tool_Process, your custom Tool Bar will appear underneath your menu bar.
This tech tip will show you an easy approach for implementing your own Tool Bar.
- Create a detail form to act as a Tool Bar.
- Create the following method:
` Project Method: Set_Custom_Tool
` Hide the default Tool Bar and display
` the custom Tool Bar instead.
` $1 - Form name
` $2 - Pointer to the form table
` $3 - Height of the custom tool bar
HIDE TOOL BAR
C_TEXT($1;$form)
$form:=$1
C_POINTER($2;$tblPointer)
$tblPointer:=$2
C_LONGINT($3;$formHeight)
$formHeight:=$3
C_LONGINT($Height;$gleft;$gtop;$gright;$gbottom)
$Height:=Menu bar height+1
SCREEN COORDINATES($gleft;$gtop;$gright;$gbottom)
Open window($gleft;$Height;$gright;$Height+$formHeight;-Plain dialog box )
DIALOG($tblPointer->;$form)
SHOW TOOL BAR
` Project Method: Choose_Tool
` This method is necessary because you
` cannot pass a pointer between processes.
Set_Custom_Tool ("Form1";->[Table 1];200;42)
` Project Method: Show_Custom_Tool_Process
$proc:=New process("Launch";32000;"Custom Tool")
- Now when you execute the method Show_Custom_Tool_Process, your custom Tool Bar will appear underneath your menu bar.