
Tech Tip: Adding plug-ins at the application level on OSX
PRODUCT: 4D | VERSION: 2004 | PLATFORM: Mac OS X
Published On: July 28, 2006
On Mac OS X, 4D allows to add plug-ins at the application level using the "Get Info" interface. Using this interface to add plug-ins simply adds the .bundle package to the plug-ins folder in the application package.
STEPS TO ADD THE PLUG-IN:
1. Control click (one button mouse) or Right click (2 button mouse) on the 4D Application to display the contextual menu.
2. Select "Get Info" from the contextual menu.
3. An info window should be displayed. Navigate to the "Plug-ins" section and expand it by clicking the triangle.
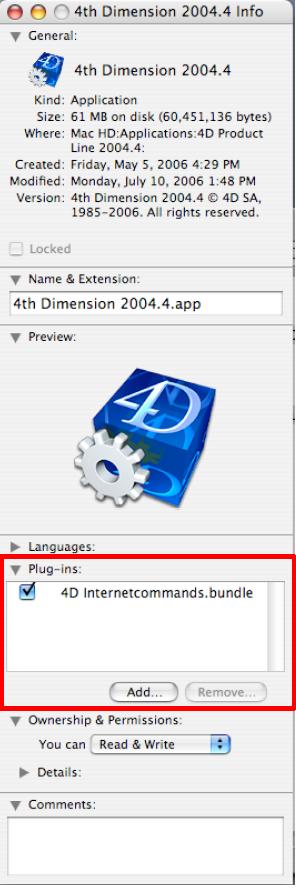
4. To add the plug-in click on the "Add..." button. A file window opens and allows to select the plug-in bundle.
(To Remove Plug-in) Select the plug-in and click on the "Remove..." button. The system will ask if you want to place the plug-in in the trash. Click continue to proceed with the removal. Selecting remove will remove the plug-in from the list. If you would like to only disable the plug-in and not remove the plug-in from the list, simply uncheck the checkbox next to the plug-in you want disabled in the list.
The above procedure has the same result as the tech tip below, which describes another procedure for installing plug-ins at the application level.
http://www.4d.com/knowledgebase?CaseID=34046
STEPS TO ADD THE PLUG-IN:
1. Control click (one button mouse) or Right click (2 button mouse) on the 4D Application to display the contextual menu.
2. Select "Get Info" from the contextual menu.
3. An info window should be displayed. Navigate to the "Plug-ins" section and expand it by clicking the triangle.
4. To add the plug-in click on the "Add..." button. A file window opens and allows to select the plug-in bundle.
(To Remove Plug-in) Select the plug-in and click on the "Remove..." button. The system will ask if you want to place the plug-in in the trash. Click continue to proceed with the removal. Selecting remove will remove the plug-in from the list. If you would like to only disable the plug-in and not remove the plug-in from the list, simply uncheck the checkbox next to the plug-in you want disabled in the list.
The above procedure has the same result as the tech tip below, which describes another procedure for installing plug-ins at the application level.
http://www.4d.com/knowledgebase?CaseID=34046