
Tech Tip: Removing legacy resources from a 4th Dimension database structure (MacOS)
PRODUCT: 4D | VERSION: 6.5 | PLATFORM: Mac
Published On: January 14, 2000
In some older (v3.5.4/1.5.4 or older) databases that have been automatically converted to work with versions 6.0/6.5 of 4th Dimension, there can be legacy code still present in the resource fork of the structure file that causes problems. In particular I have seen layouts that look fine when previewed on screen but come out of the printer blank, and there have been reports of problems compiling databases with legacy resources. If you use - or have used - externals stored in the structure and failed to remove them before upgrading to v6.0/6.5 then you may be a victim of this problem.
It is important to note that there are other kinds of resources that can legitimately be found in a 4D structure file - sounds, fonts, strings, etc. Following the directions below will result in the loss of ALL resources in your database structure. Therefore, please adhere to rule #1:
Rule #1: Never run ResEdit on your original database, always make a backup copy first!
If, by following the directions in this Tech Tip, you successfully cure whatever problem is ailing your database, then you can either replace any needed resources or go back and try to narrow down the problem to a particular resource or set of resources and remove only those resources from your database structure. Remember, there are only two kinds of computer users: those who have lost data, and those who will. So please adhere to rule #2:
Rule #2: Please see rule #1.
Here are the steps:
- Step 1:
OK, let's get started. The first thing you will need is a copy of Apple's ResEdit. You can obtain one by visiting the following URL:
ftp://ftp.apple.com/developer/Tool_Chest/Developer_Utilities/ResEdit_2.1.3/
Read the stern warning about using this program and proceed with appropriate care. - Step 2:
Launch 4th Dimension and create a new, blank database called "New Sample DB". Note the location on your hard drive where you saved this database before quitting 4D - you will need it in Step 6. - Step 3:
Open your suspect database structure with ResEdit by selecting Open from the File menu or dragging & dropping the structure on top of the ResEdit icon from the Finder (see figure 1).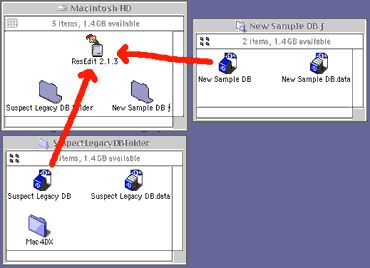
(figure 1)- Step 4:
Choose Select All from the Edit menu to highlight all the resources in your suspect database (see figure 2).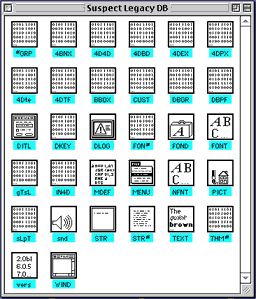
(figure 2)- Step 5:
Choose Clear from the Edit menu to remove all old resources.- Step 6:
Open the New Sample DB structure with ResEdit by selecting Open from the File menu or dragging & dropping the structure on top of the ResEdit icon from the Finder (see earlier figure 1).- Step 7:
Choose Select All from the Edit menu to highlight the two resources which you will find in the blank database structure (they were placed there by default when 4D created the structure).- Step 8:
Choose Copy from the Edit menu to place these two default resources onto the clipboard.- Step 9:
Close the New Sample DB window in ResEdit to switch back to your suspect database structure (the one that we cleared in Step 5).- Step 10:
Choose Paste from the Edit menu to place the two default resources from the clipboard into your suspect database structure.- Step 11:
Quit from ResEdit and say "Yes" when asked if you want to save the changes to the file.
Now run the modified database and see if removing the old resources fixed your problem. If it does and you aren't missing any needed resources, then continue with your newly fixed database. If it doesn't then return to your unmodified backup copy and continue debugging.
Note: if you get a message saying your structure and data files do not correspond to each other, you need to remove the WEDD resource from the data file (or add one back into the structure using Customizer Plus) - Step 4: