
Tech Tip: Creating Uniquely Shaped Buttons with SVG
PRODUCT: 4D | VERSION: 14.0 | PLATFORM: Mac & Win
Published On: November 5, 2014
Default buttons are typically a rectangular form, to make a user interface look more appealing and presentable uniquely shaped buttons may be desired. With the default buttons they are all rectangularly shaped and when using picture buttons even if it is transparent they are still rectangularly shaped as shown below with the rectangular markers.
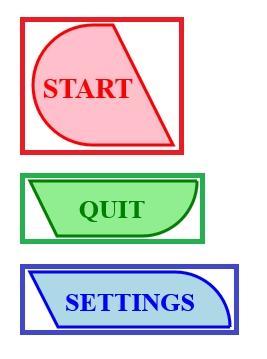
Below are some simple SVG objects that will be arranged together in an SVG document along with the code used to generate them in the document, the code to create the SVG Document is at the end of the Tech Tip:
When formatting the buttons to make them presentable there will be an overlap misrepresenting the buttons as marked below with the black rectangle.
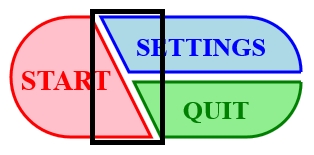
To avoid the overlapping issue that will be presented when trying to layout the buttons as seen in the bottom of the image above, the uniquely shaped buttons above can be created through the use of SVG.
Create an SVG document with SVG objects as buttons and assign each object an ID.
Then export the SVG to a picture object using SVG EXPORT TO PICTURE.
NOTE: The example SVG objects created have the IDs set to "START", "SETTINGS", and "QUIT" for each respective object using the SVG_SET_ID command.
Allow the object to have the On Clicked trigger and run a similar method for the picture object:
With this method there will be no overlap and clicking the uniquely shaped button as represented by the image will return the correct output as shown below in the 4 cases:
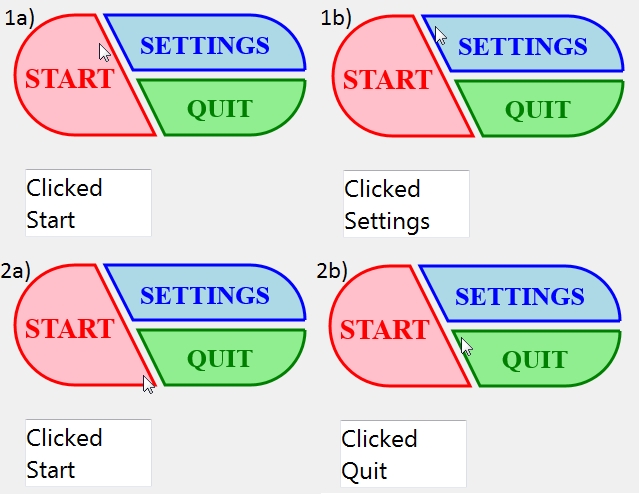
Each pair of cases would have an over lapping area with rectangular buttons and is now avoided by using SVG to create uniquely shaped buttons.
The method to create the buttons used in this tech tip was:
Below are some simple SVG objects that will be arranged together in an SVG document along with the code used to generate them in the document, the code to create the SVG Document is at the end of the Tech Tip:
When formatting the buttons to make them presentable there will be an overlap misrepresenting the buttons as marked below with the black rectangle.
To avoid the overlapping issue that will be presented when trying to layout the buttons as seen in the bottom of the image above, the uniquely shaped buttons above can be created through the use of SVG.
Create an SVG document with SVG objects as buttons and assign each object an ID.
Then export the SVG to a picture object using SVG EXPORT TO PICTURE.
NOTE: The example SVG objects created have the IDs set to "START", "SETTINGS", and "QUIT" for each respective object using the SVG_SET_ID command.
Allow the object to have the On Clicked trigger and run a similar method for the picture object:
| Case of : (Form event=On Clicked) //Note: The following command returns the position in relation to the form GET MOUSE($MouseX;$MouseY;$MouseButton) //NOTE: The following command searches in relation to the object... //There will be a need to subtract the left and top position... //of the picture object if any are not equal to 0. $svgID:=SVG Find element ID by coordinates(*;"pict_Obj";$MouseX;$MouseY) //Check which button was clicked and run desired code Case of : ($svgID="START") var1:="Clicked START" : ($svgID="SETTINGS") var1:="Clicked SETTINGS" : ($svgID="QUIT") var1:="Clicked QUIT" End case |
With this method there will be no overlap and clicking the uniquely shaped button as represented by the image will return the correct output as shown below in the 4 cases:
Each pair of cases would have an over lapping area with rectangular buttons and is now avoided by using SVG to create uniquely shaped buttons.
The method to create the buttons used in this tech tip was:
//Generate SVG Document $svgRef:=SVG_New //Creates Start Button $objRef1:=SVG_New_arc ($svgRef;100;100;60;180;360;"red";"pink") SVG_PATH_MOVE_TO ($objRef1;100;160) SVG_PATH_LINE_TO ($objRef1;180;160) SVG_PATH_LINE_TO ($objRef1;120;40) SVG_PATH_LINE_TO ($objRef1;100;40) SVG_SET_ATTRIBUTES ($objRef1;"style";"fill:pink; stroke:red; stroke-width:3") SVG_SET_ID ($objRef1;"START") $objRef1text:=SVG_New_text ($svgRef;("START");95;85;"helvetica";28;Bold;Align center;"Red") //Creates Settings Button $objRef2:=SVG_New_arc ($svgRef;275;95;55;0;90;"blue";"lightblue") SVG_PATH_MOVE_TO ($objRef2;275;40) SVG_PATH_LINE_TO ($objRef2;130;40) SVG_PATH_LINE_TO ($objRef2;158;95) SVG_PATH_LINE_TO ($objRef2;330;95) SVG_SET_ATTRIBUTES ($objRef2;"style";"fill:lightblue; stroke:blue; stroke-width:3") SVG_SET_ID ($objRef2;"SETTINGS") $objRef2text:=SVG_New_text ($svgRef;"SETTINGS";230;53;"helvetica";26;Bold;Align center;"Blue") //Creates Quit Button $objRef3:=SVG_New_arc ($svgRef;275;105;55;90;180;"green";"lightgreen") SVG_PATH_MOVE_TO ($objRef3;275;160) SVG_PATH_LINE_TO ($objRef3;190;160) SVG_PATH_LINE_TO ($objRef3;163;105) SVG_PATH_LINE_TO ($objRef3;330;105) SVG_SET_ATTRIBUTES ($objRef3;"style";"fill:lightgreen; stroke:green; stroke-width:3") SVG_SET_ID ($objRef3;"QUIT") $objRef3text:=SVG_New_text ($svgRef;"QUIT";245;116;"helvetica";26;Bold;Align center;"Green") //Sets the SVG document as the picture object SVG EXPORT TO PICTURE($svgRef;pictureObject;Copy XML data source) |