
Tech Tip: ListBox Row Height Control
PRODUCT: 4D | VERSION: 16 | PLATFORM: Mac & Win
Published On: November 22, 2016
4Dv16 introduces a new property for programatic control over individual Listbox rows' heights. This feature is only available for array based listboxes. Under the "Coordinates & Sizing" section of the properties window is a new property "Row Height Array." A longint array added to this property will control the heights. The arrays position and row number will match up and assigning a value to the position in the array will apply an effect to the row.
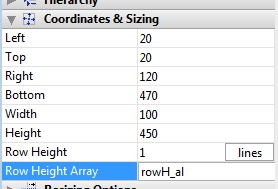
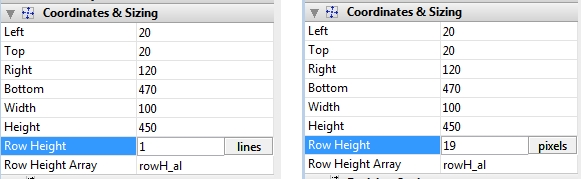
The value applied to the array to control the listbox can either be associated as either the number of lines or the number of pixels based on the selected "Row Height" property above the "Row Height Array" property.
Below is an example:
With the two list boxes below:
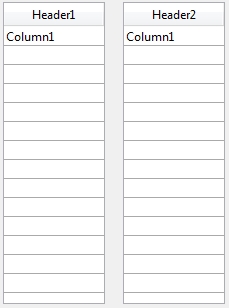
Applying the following code in which they both contain the same arrays of Column1 but with the left having a "Row Height Array", rowH_al, and the right listbox not having a "Row Height Array".
Will result in the following:
Tip:
A good command to use with this feature is the OBJECT GET BEST SIZE command while specifying a maxWidth to limit the columns witdth and then apply the resulting Heights to each row.
Related:
With the "Row Control Array" manipulation of individual listbox rows are more easier.
http://kb.4d.com/assetid=77453
The value applied to the array to control the listbox can either be associated as either the number of lines or the number of pixels based on the selected "Row Height" property above the "Row Height Array" property.
Below is an example:
With the two list boxes below:
Applying the following code in which they both contain the same arrays of Column1 but with the left having a "Row Height Array", rowH_al, and the right listbox not having a "Row Height Array".
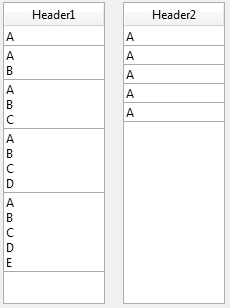
| ARRAY TEXT(Column1;0) APPEND TO ARRAY(Column1;"A") APPEND TO ARRAY(Column1;"A\nB") APPEND TO ARRAY(Column1;"A\nB\nC") APPEND TO ARRAY(Column1;"A\nB\nC\nD") APPEND TO ARRAY(Column1;"A\nB\nC\nD\nE") ARRAY LONGINT(rowH_al;0) APPEND TO ARRAY(rowH_al;1) APPEND TO ARRAY(rowH_al;2) APPEND TO ARRAY(rowH_al;3) APPEND TO ARRAY(rowH_al;4) APPEND TO ARRAY(rowH_al;5) |
Will result in the following:
Tip:
A good command to use with this feature is the OBJECT GET BEST SIZE command while specifying a maxWidth to limit the columns witdth and then apply the resulting Heights to each row.
Related:
With the "Row Control Array" manipulation of individual listbox rows are more easier.
http://kb.4d.com/assetid=77453